Aug 08, 2022 - Atlanta, GA
An image says a thousand words, so make sure your professional headshot is conveying the right message to employers and connections.
“The place that people most often see a headshot is online where they’re very small,” said Rob Felt, Institute Communication’s photography manager at Georgia Tech. “Simplicity is important because the size of the image changes the way you view it.”
With some basic photography and composition knowledge, you can take your headshot to the next level using just your phone’s camera. Felt shares his photography wisdom and provides a few tips for taking your own professional-level headshot.
Shade is your friend. Felt recommends finding the shade of a building so that you have a nice, even light. “Direct sun would be the number one thing to avoid because you will get a lot of shadows,” said Felt. “Other than squinting, the high contrast can be a real problem. You don’t want a shadow of your nose going over your cheek. If the day is sunny, it doesn’t really matter as long as you’re in the shade.”
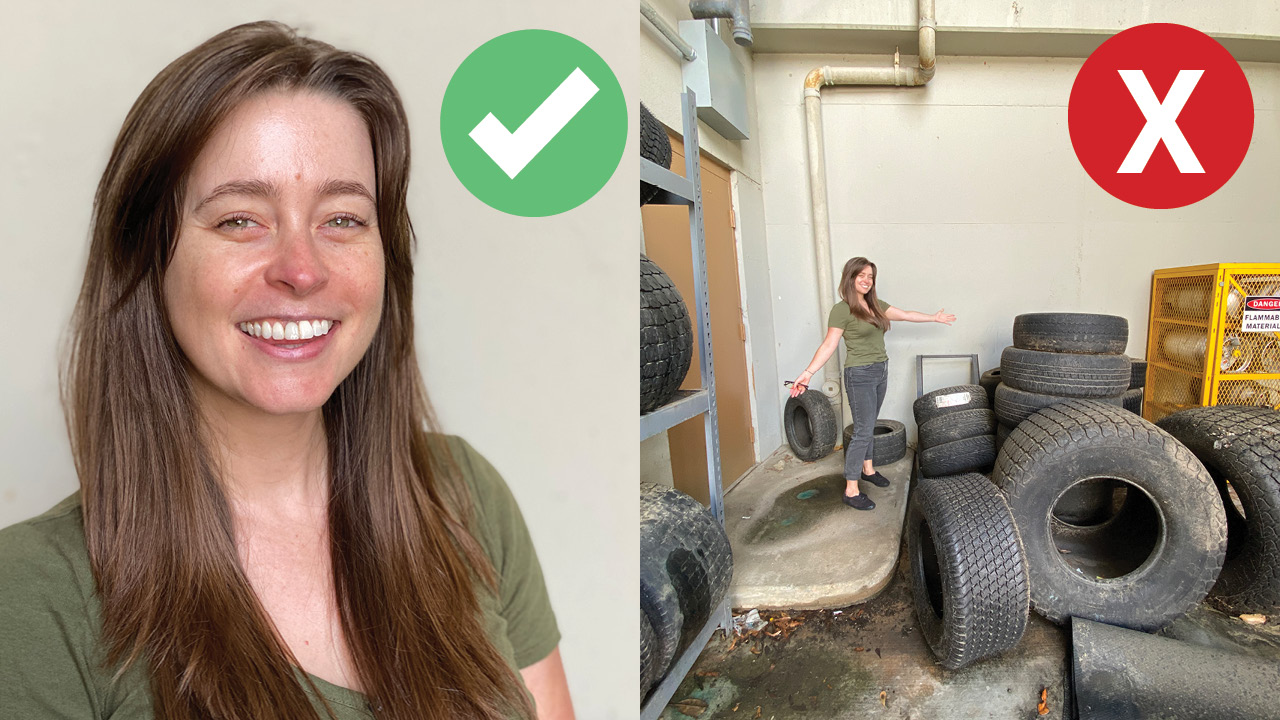
Aim for simplicity. If you’re using the shade of a building to achieve the right lighting, then you want to make sure the building you are using would make an acceptable background. “Visually, you want people’s eyes attracted to your face and not everything around your face, so find a building that has a basic wall with a single color,” said Felt. For those who live in Atlanta, Felt suggests trekking over to Scheller to pose in front of their gold-yellow wall. “It’s a really cool color, especially for Georgia Tech,” said Felt.
Frame your shot. According to Felt, most social sites or email clients provide a round or square frame for the user’s photo. With that in mind, you want to position your body in the center of the frame. “Leave enough room around the edges so you’re not right up against the top or either of the sides because that circular frame is going to cut the corners.” To achieve that classic, business headshot, Felt says that we only want our head and shoulders in the frame. “I wouldn’t do the whole upper body,” said Felt. “I would keep it pretty tight because it is going to be tiny, so you want your face to have as much real estate as possible.”
Strike a pose. After you have found your location and figured out how to frame your shot, now you’re ready to start posing. First, Felt recommends figuring out what your best side is. “Usually, your best side has to do with the direction of your hair or which side you like to wear it,” said Felt. “If you don’t know, you can try posing from both sides to determine which you like best.” Once you are posing with your “best” side facing the camera, Felt suggests moving out from your background wall so that you aren’t up against it then slightly turn your shoulders and have your head mostly towards the camera. Make sure you can see both of your eyes. “A lot of people will look at their friends or the phone,” said Felt. “You want to try to look right into the circle of the lens.”
Coordinate with a few friends. In Felt’s studio experience, there’s a different energy when a small group comes in to do their headshots. “Try to get three or four people together to make it a fun thing and lighten it up a bit so it’s not this one-on-one stress,” said Felt. He suggests coordinating headshots on a day when everyone will be dressed up already, such as a career day or a presentation day. “A lot of people don’t like having their picture taken, right? The idea of standing in front of a camera and staring at it, people get stressed out about that.” According to Felt, having friends with you can help you in a few ways. First, you will have someone with you to take the photo. Second, you may feel more relaxed, which can result in a more natural smile. Last, someone in your group will be likely to have a phone with multiple lenses to capture a higher-quality image.
Say “cheese.” “You want to smile,” said Felt. “A natural smile is not the easiest thing in the world for everybody. You don’t want to look like you have a forced smile; you want to look confident and pleasant. Having a few friends around can help you with achieving a natural smile. You don’t want to look goofy, and you don’t want to look mean, so you have to find that balance in the middle.”
Use the camera’s 2x feature. “Most modern phones have more than one camera on them,” said Felt. “It would be really helpful to use the 2x feature. It’s physically a different lens; it’s a different focal length.” Felt explains that when we take a selfie with the standard focal length, a wide angle distorts our features, which is why we might not like how we look in a selfie. “If you have access to a phone that has a 2x lens on it, I would definitely use that,” said Felt. “That’s kind of important.”
To edit or not to edit. Felt does not recommend editing or using any filters for a traditional headshot. “The phones are pretty good because of all the AI going on in the background,” said Felt. “It’s doing the facial recognition, so it’s going to expose properly for the face. That’s something that professional cameras don’t even do. When people try to make their photo better, sometimes they make it worse.” Felt suggests that if you are going to make minor adjustments, make sure that the brightness on your phone is turned up so that you aren’t overcorrecting because your phone screen is dim. “I would edit indoors,” said Felt. “I wouldn’t try to do that on the spot.”
Your face is the most important aspect. If you take anything away from Felt’s advice, just keep in mind that your face is the most important part of the image. “In the environment we’re in now it’s more common for people to have a ‘less-than-typical’ studio headshot as their profile picture,” said Felt. “Ten or 20 years ago, it would be very prescribed. You would really have to fit a mold. Now, even on LinkedIn, which is mostly about profession, you see a lot of variety. Just make sure your face is the most important thing in the picture--more than the background, more than your clothes. Just make sure your face is recognizable when your picture is small.”